
Introduction
To do bulk redirects in WordPress we will want to either use a plugin or add redirect rules directly to htaccess. The first method is the usage of the Redirection plugin, and the second method is to use the .htaccess file in your website.
Using the Redirection plugin is easier and less technical, however it is less efficient and your redirects can be slower. If you decide to use the .htaccess method, it is more technical but your redirects are faster because they are processed before anything else in WordPress.
Here is a guide on how to do both of these methods, so that both technical and non-technical users can implement redirects on their website.
Method 1 – Redirection Plugin
Install Redirection Plugin
Firstly, if you haven’t already installed the Redirection plugin, you will need to do so for this method. Make sure that you install the correct redirection plugin, which is this one: https://en-gb.wordpress.org/plugins/redirection/. If you haven’t installed a plugin before, you can do this by hovering over “Plugins” in your left-hand admin bar, clicking “Add New” and using the search bar for “Redirection”, the plugin you want should be at the top of the list as it’s simply called “Redirection” and has over 900,000 active installs and over 300 reviews.
Create Redirection Spreadsheet
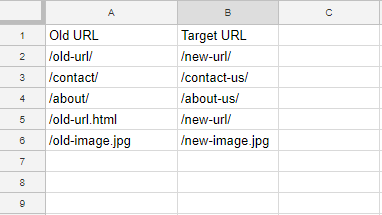
Next, you’ll need to create a spreadsheet using software such as Microsoft Excel or OpenOffice Calc listing all of your old URLs and your redirects. In the first column, list the paths all of the URLs that you need to redirect, make sure you don’t include the protocol and domain name. So if the URL is http://example.com/example-page/, only put /example-page/ into the column.
In the second column, create a list of redirects for the old URLs, also make sure for this column you don’t include the protocol and domain name, like you did for the first column.
It should look something like this, with the paths of the old URLs in the first column and the paths for where you want them to redirect to in second column:
Once the spreadsheet is completed, save it as a .csv file.
Upload Redirects
Go back into the Redirection plugin and go to the Import/Export tab (if you are using an older version of the Redirection plugin you may not see the Import/Export tab, as the ability to import your redirects is in the Options tab).
You should be able to see a section called “Import”, where you can upload your redirection spreadsheet, simply click the “Add File” button, choose the group to add the redirections to (this doesn’t have any technical effect, it’s just so you can categorise your redirects) and click Upload. You should then see a message at the top saying your redirections were successfully imported.
Testing
Once you’re redirects have been uploaded, I recommend testing a few of them out to make sure the redirects have worked. In your spreadsheet, visit some of the old urls and see whether they redirect to the correct pages. If they do then all’s good! If they haven’t then try visiting the old urls in an incognito tab or another browser as the urls may be cached.
If they still haven’t worked then I recommend moving onto my next method (which is the method I prefer).
Method 2 – .htaccess file
Create Redirection Spreadsheet
First of all, create a spreadsheet using software such as Microsoft Excel or OpenOffice Calc with one column listing all your old URLs, and the next column listing all the URLs you want the old URLs to redirect to. If you tried the Redirection method and it didn’t work, you should already have the spreadsheet created. However this method requires the whole URL, unlike the Redirection method with only requires the path of the URL so you will need to amend the spreadsheet so that the list of URLs contain the protocol and the domain name.
Depending on how many redirects you have, this is likely going to take you a while if you haven’t already got both lists ready. But don’t worry, after you have your spreadsheet ready, the next steps are quick and easy.
Create .htaccess Rules
Once you have created your spreadsheet, paste both of the columns into a notepad document to remove any formatting. It should look something like this:
http://www.example.com/old-url.html http://www.example.com/new-url.html
http://www.example.com/contact http://www.example.com/contact-us
Etc
Then, copy everything that’s in the notepad document and paste it into an online Rewrite .htaccess Rule generator, which will turn your list of URLs into something we can use. My favourite tool to do this is https://donatstudios.com/RewriteRule_Generator. If you use this tool it should give you something that looks like this:
# 301 — http://www.example.com/old-url.html => http://www.example.com/new-url.html
RewriteRule ^old\-url\.html$ /new-url.html? [L,R=301]
# 301 — http://www.example.com/contact => http://www.example.com/contact-us
RewriteRule ^contact$ /contact-us? [L,R=301]
Etc
Copy all the rules it gives you as we’re going to need these for the next step.

Find .htaccess File
Now, you’re going to need to access and edit the .htaccess file of your website. Most hosting companies usually have a control panel where you can find this, alternatively, you can use an FTP client such as Filezilla to locate it. If you find you have more than one .htaccess file, you need to use the most specific .htaccess file, because some websites will have more than one i.e. if you have .htaccess files inside and outside of your public_html file, you should use the one inside.
Once you’ve found the correct .htaccess file, download it and open it up so you can edit it. Also, you should save a backup of your .htaccess file just in case the redirects cause an issue with your website. If there is an issue you can just upload your backup and your site should go back to how it was before. Issues can be caused by already having redirects in the file, and your new redirects may clash with what’s already in there.
Alternatively if you have the Yoast SEO plugin installed on your WordPress site, if you navigate to Yoast > Tools > File Editor, you should find a page displaying an editor for your .htaccess file. Ensure that you have a copy of what was in there before you upload anything new just in case anything goes wrong.
Implementation
Next, paste everything from the Rewrite Rule Generator underneath whatever is already in the file. Additionally, you should see a line at the top saying “RewriteEngine On”, if you see this then save the file and re-upload it. However, if you see it says “RewriteEngine Off”, then simply change “Off” to “On”, and save and re-upload the file.
Testing
Now that your redirects are uploaded you should check that they work, so visit one of your old URLs and see what happens. If it redirects to the URL you specified then the redirect has worked, although I would recommend checking a few different old URLs just to make sure. If you have tested your redirects and they don’t work, try moving them to directly underneath “RewriteEngine On” instead of being at the bottom of the file.
Summary
Bulk Redirects with the Redirection Plugin
- Install Redirection Plugin
- Create Redirection Spreadsheet
- Upload Redirects
- Test that the redirects have worked
Bulk Redirects with .htaccess File
- Create Redirection Spreadsheet
- Create .htaccess rules
- Find .htaccess file
- Implement Redirects
- Test that the redirects have worked
