
The purpose of this guide is to detail how to track multiple sub domains in Google Analytics with the universal tracking code. This is easy enough with universal tracking but it does need a small bit of tinkering so you can clearly see what content belongs to which sub domain. I will also attempt to give you some basic advice on how to avoid common problems and how to set up goals under this new multi sub domain view.
I will go over this from top to bottom as well so it is hopefully doable for those completely new to analytics as it is for the old hands – so, apologies if some of this is telling you how to suck eggs but simply hop forwards to the part that is most relevant to you.
A note and some terminology
We will create a new property to combine your subdomains so we will effectively archive any old Analytics data – I like this approach as we can review any goals or anything we had set up in there and gradually import it in if it is of value. It is almost an opportunity to audit the Analytics and I do so love an audit.
Adwords accounts are set up in a structured hierarchy:
Accounts > Property > View
- The account will usually be you or your client
- The property will be the actual website or set of websites you want to track (root domain)
- A view is the data (or subset of data) you want to look at
It’s important to understand some of these basics as it will make the rest of this easier to follow – for the keen there is some more information on Google Analytics account structure linked in the notes below this post but read on and if you get stuck you can always drop me a comment and I will try to help.
Preparation
Before we get started you are going to need:
- Access to your (or your clients) Google Analytics account
- Access to the sites (or tag manager) to add the tracking code
- About 30 minutes to get everything done and tested
Ready? Let’s dive in. 🙂
1. Create a new property
Here we will look at how to create a new property (and account if needs be):
Firstly we want to log into Google Analytics and click on the Admin tab – we should see something that looks something like this:
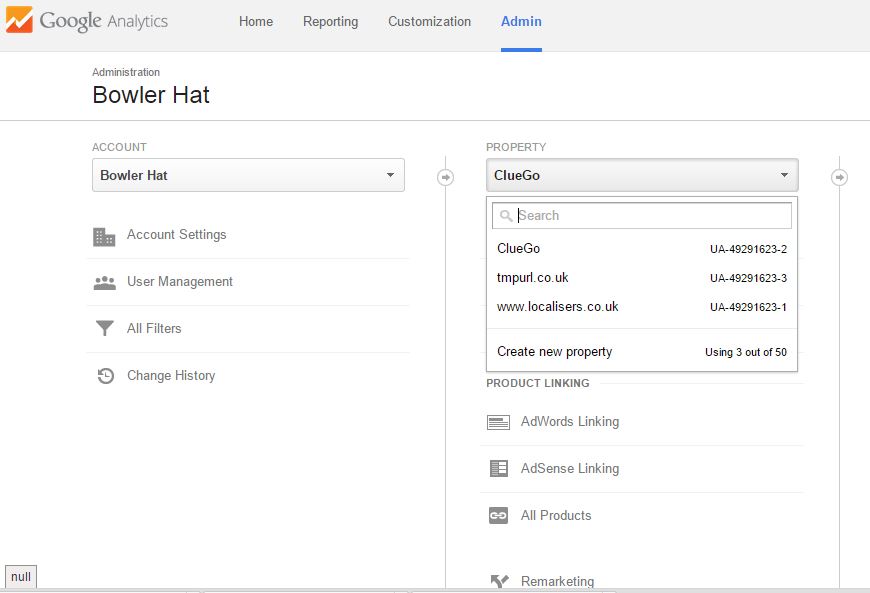
Here we either want to select or create an account and then select an existing property or click the ‘create a property’ link at the bottom of the drop down menu.
For the purpose of this example, I am going to create a new property under the Bowler Hat account.
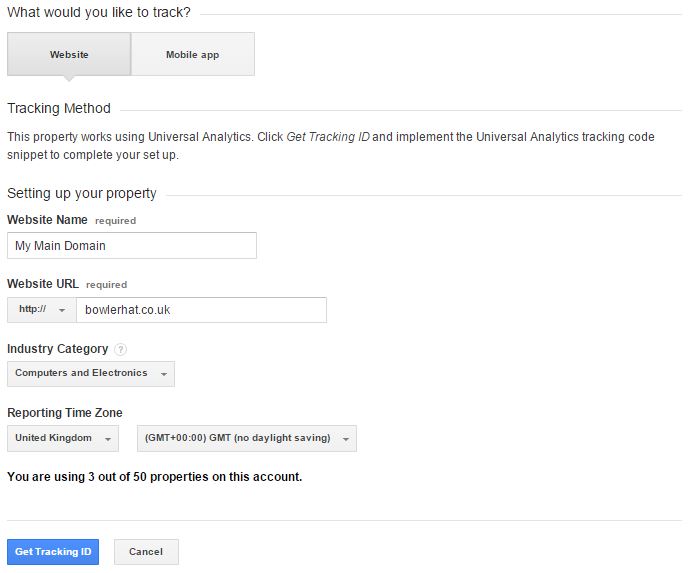
Once we have filled this in, click the ‘Get Tracking ID’ to get your unique tracking ID and the javascript code that you will need to add to your various subdomains.
The tracking ID and tracking code should look a little like this:
Tracking ID
UA-49291623-4
Tracking Code
<script>
 (function(i,s,o,g,r,a,m){i['GoogleAnalyticsObject']=r;i[r]=i[r]||function(){
 (i[r].q=i[r].q||[]).push(arguments)},i[r].l=1*new Date();a=s.createElement(o),
 m=s.getElementsByTagName(o)[0];a.async=1;a.src=g;m.parentNode.insertBefore(a,m)
 })(window,document,'script','//www.google-analytics.com/analytics.js','ga');
ga('create', 'UA-49291623-4', 'auto');
 ga('send', 'pageview');
</script>
Notes:
Here we have used the root domain in the ‘Website URL’ box as we want to track various subdomains on that URL & ensure you select the correct time zone to ensure your data makes as much sense as possible as things can get pretty confusing pretty quickly when we have multiple sites to track.
2. Install tracking code on multiple sites
Okay, we now have our tracking code and we need to install it on our various sites. As ever, there are multiple ways to do this so I will explain the basic option and point you in the direction of other options.
2.1. Add the universal tracking code to your header
Simply copy and paste the tracking code in its entirety before the closing <head> tag. That is if you want your code to sit directly before the tag that looks like this: </head>. Do this to all subdomains that you require to track – use the exact same tracking code.
2.2. Other options
There is a myriad of other options here depending on the CMS technology and your access but a few common ones that pop up are Google Tag Manager and using a WordPress plugin. Read up on tag manager here and I like the Yoast Analytics plugin for WordPress. Again, do this for every subdomain you need to include.
2.3. Test the tag is working (duh)
To avoid spending hours scratching your head wondering why nothing is working or sites A and B are working but not C test that the tracking code is properly placed and working on each domain. Fortunately, Google makes this pretty simple to diagnose with a Chrome browser plugin called Tag Assistant. Tag Assistant will give you an overview of whether or not the analytics code is firing correctly and will point you towards the problem if it is not.
- If you don’t use Chrome you will need to download it
- Install the tag assistant plugin
- Have a read of the Tag Assistant documentation if you want to be thorough
Then we should see a little tag to the right of your browser address bar:

Clicking on this provides us with two options – either will work, but I tend to use ‘Always check this domain’ as it saves me a bit of an effort having to do this every time I visit. It also alerts me visually in the address bar to how many tags this site has and I can just click the tag and get an instant report.
Hopefully, you will get a report stating that we are happy and your tag will be green and happy!
What if it does not work? Well, unfortunately, websites being the complicated things they are, things can and do go wrong and you will need to dive in and find out exactly what the problem is. The tag assistant will usually give you some direction but you may need a tech to help you out here if it is placed correctly but still not working (likely something else is interfering with it).
As a final test (as you can never really do enough testing) you can dive into the real-time reports on Google Analytics and you should see the pages and domains as you click them.
Simply go to ‘Real-Time > Content’ and do a bit of clicking on your various properties to see the visits popping up.
* Note at this point we can’t distinguish different domains only pages so if you visit a homepage on three subdomains they will all show as ‘/’.
Once this is done we have a single analytics view that is showing data from multiple subdomains – the only problem is that by default Google Analytics does not show the URL so we can’t be sure which page is which. If you have a situation where subdomains have the same URL structure this is even more confusing so we have to do a little further tweaking.
We will leave this view in place as it is and keep it as our sanity view – no filters, no tweaks – just raw data that we can refer to should anything look a bit wonky elsewhere.
3. Create a filtered view to show URLs in our reports
We have our naked view but we now want a view that we have tweaked to show the subdomains in Google Analytics. So, we can easily see if a page is on subdomain A, subdomain B etc. This will be our main view that we work with on a day-to-day basis. This is a copy of the default view with a filter to show the full domains so we can distinguish page views between sites.
- Log in to Google Analytics
- Click the Admin Link
- Select the correct account and property from the first two columns
- In the third column select ‘create new view’ from the drop down (last option)
- I tend to call this ‘All Data + URLs’ but you can call it whatever you feel is most descriptive
- Select the correct time zone and click the ‘new view’ button
Now we can set up our filters to show us the URL details in our reports
- Click the ‘Filters’ option from the View column
- Click New Filter
- Name the Filter – again your choice but I tend to go with ‘Show URLs’
- Select ‘Custom’ from ‘Filter Type’
- Select ‘Advanced’ from the six check box options (last option)
- Field A – Host Name from the drop down and a value of: (.*)
- Field B – Request URI from the drop down and a value of: (.*)
- Output To Field – Request URI from the drop and a value of: $A1$B1
- From the four tick boxes
- Field A Required – Yes
- Field B Required – No
- Override Output Field – Yes
- Case Sensitive – No
If you followed the steps above you should have something that looks like the following:

You can now dive into the real-time testing section of Google Analytics and now we will see the full URLs of the pages and subdomains you are clicking on.
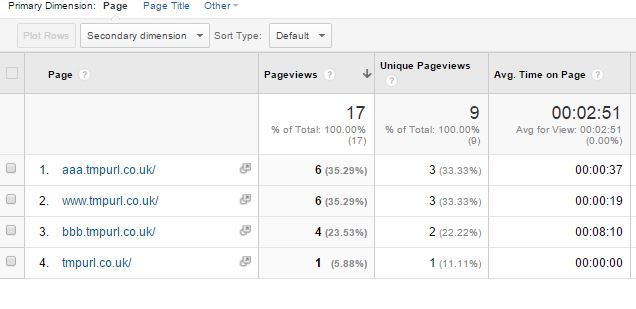
A little later you can dive into the standard reports and you will see your various pages and sub domains in the ‘Behaviour > Site Content > All Pages’ report.
Below is an example I set up with a root domain and three subdomains with the sub domains or www, aaa & bbb – the report shows visits to the homepage of each of these subdomains. Clearly here we can see our various domains together in a single report.
4. Set up views for each domain (optional)
The final job here is to set up a simple view for each of your individual domains so we can view each site as an individual entity. In practice we are just setting up a basic view and excluding the other domains:
- Login to Google Adwords
- Click on the Admin Link
- From the View drop-down menu select ‘Create new view’
- Name this view as per your domain (or something you will recognise)
We now have to put a filter in place to filter out the data that we are not interested in – this should be getting familiar now so I will shorthand the instructions a little:
- Adwords > Admin
- Make sure the correct account, property and view are selected
- Click ‘Filters’ in the menu and then ‘New Filter’
- Ensure ‘Create new filter’ is selected
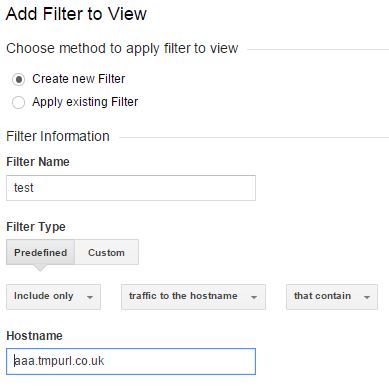
- Give your filter a name – I usually go with the full URL or subdomain
- Filter Type: Predefined
- Set the three drop downs to: Include Only – Traffic to the Hostname – That Contain
- Hostname field: The URL you want to track – sub.domain.co.uk
To create a filter for ‘aaa.tmpurl.co.uk’ you should have something that looks like:
Now you need to go through and do this for each individual sub domain you care about. I tend to recommend you do it for all, as sooner or later you will want this data and filters don’t alter historical data.
5. Set up Destination Goals on your multi sub domain view
Now you likely want to set up destination goals but we have one last potential problem here as all destination goals must match exactly how the page is displayed in the reports. So, I tend to follow the following process:
- Go to ‘Behaviour > Site Content > All Pages’
- Copy the page that you want to track from the report – www.tmpurl.co.uk/page.html
- Go to the Admin tab and select the account, property & view you want to set a goal for
- Select ‘Goals > New Goal’
- Goal Set Up > Custom > Next Step
- Give your goal a name – I like the page for a destination goal or what it signifies
- Set goal destination to the value you copied from the ‘all pages’ report
- Click create goal
Now we have a goal that will work with your multiple sub domain view. So, you can track traffic coming in on site A and hitting a goal on site B which is, if you like this kind of thing, very cool.
6. Recap
At this point we should have the following:
- Our default view of the data from all sites where you have installed your tracking code
- A filtered view of the data from all sites that shows the full URL
- A set of individual views for each individual site
We may also have some destination goals configured that work in either the naked, filtered or individual views by ensuring we always match the page name in the ‘Behaviour > Site Content > All Pages’ report.
I mentioned this above but don’t be tempted to skip creating the filtered views for individual domains. These filters do not alter historical data so you may suddenly have a need and find yourself wanting.
That is pretty much it. Assuming nothing radical changes in Analytics this should help you set up cross domain tracking in the most sensible way possible. This can be most problematic when we have existing complex tracking on the individual sub domains but again the best way we have found to manage this is to document everything in the existing profiles, set up a new profile to combine all sites and then follow these instructions. You can then work through the old accounts adding in any tracking from the previous individual accounts over to our new account.
Any questions or if we can help at all get in touch or drop a comment below. If this was useful please share this post on your favourite social platforms (social links are below the more reading links).
More reading (for the keen or geeky amongst us)
Google Analytics Account Structure – https://support.google.com/analytics/answer/1009618?hl=en-GB
Set up Universal Tracking – https://support.google.com/analytics/answer/2817075?hl=en-GB
Google Tag Manager – https://support.google.com/tagmanager/answer/3281379?hl=en-GB
WordPress Analytics Plugin – https://yoast.com/wordpress/plugins/google-analytics/
Setting Goals in Google Analytics – https://support.google.com/analytics/answer/1032415?hl=en-GB


2 Responses
Hi Marcus,
Thanks for writing instructions on how to set this us!
So far, I’ve been able to have my domain/subdomain names prepended to the pages in Real-Time reports, but nothing is showing up in Behavior, Audience, or Acquisition for some reason. What might be causing the data not to show up there?
Richard
Hey Richard
Hard to say without taking a look. Drop me an email via the contact page and I can dive in and take a quick look for you. Hopefully, get it fixed. 🙂
Marcus