
6. Mapping
Page Goals, Structure & Content
The final step before we pull everything together is to map out all of the pages.
This covers three essential steps for each page (or type of page) on the site:
· Page Goal(s)
· Structure & Content
· Page Features
This process builds on the initial research and the previous steps to clarify your aims with goals and objectives, define the hierarchy (sitemap) and identify any essential features.
With these high level steps all well thought out you can now start to look at the specifics and detail exactly what each page will look like.
We want to use the same degree of rigour here to really think this through and map everything out.
Download the Free ALCHEMY Website Planning Guide
The following are some simple yet important aspects to consider to get the very best from this process.
1. Start at the end & work back
When most websites are designed they typically start with the homepage. This is completely wrong. The homepage should be a tool designed to get your audience segments where they need to be as quickly as possible.
What you should do here is start with the deepest pages in your sitemap and work backwards. These deeper pages are likely your products and/or services and are where the real conversions happen.
By starting at the end and getting these pages right massively simplifies structuring any category pages and the homepage.
2. Expect to iterate
It is expected, or even desirable, to loop back to the sitemap and essential features during this mapping process. The thought behind this procedural approach is that you will identify elements as you go and that is good – it is something you missed.
3. Map out page types rather than all pages
In most cases the structure of product and category pages will be identical. Maybe this changes in different categories but the goal should be to map out what is needed rather than feel like a slave to the process.
If you have a standardised product and category layout you only need to map out one of each in detail.
4. Page Numbering
We find it useful to use a simple numbering system for the sitemap and the pages to cut
down on any confusion.
- Home
- About
- Services
- Service A
- Service B
- Contact
You get the idea, and this helps ensure that pages and sub pages can be clearly
identified.
5. Understanding Information Hierarchy
A sitemap shows the overall structure of the pages on your site.
A pagemap shows the structure of the information on the page itself.
When you start development you will almost certainly want to wireframe the pages and there may well be further tweaks, revisions and interactions but having a simple bulletpointed structure for what is on each page will make this process so much easier.
You should be able to look at the structure of the page and see how everything contributes to the overall goal of the page (which in turn contributes to the goals of the site and the goals of the business).
6. Conventions
Conventions are established design patterns and expectations that users are familiar with when they navigate the web. Think of conventions as unwritten rules that make websites intuitive and easy to use.
Conventions are things like:
· Logo in the top-left (clickable, links to homepage)
· Main navigation at the top or left-hand side
· Footer contains contact info, privacy policy, social links
· Search bar in the top-right or clearly visible
· Responsive design (mobile-friendly layout)
· Hamburger menu (for mobile navigation)
· Underlined text for clickable links
· Headlines and subheadings to break up content
You get the picture. These are the conventions of the web. Things you don’t even think about as you know, intuitively, that this is how things work.
When you break these conventions, you ask a little more of your visitor. There can be a good reason for this, but, in most cases, you risk confusing users and asking too much of them so they will give up and instead go to your competitor’s easier-to-use website.
7. Avoiding web design overload
A structured planning process like this avoids the overload in website design projects that often leads to overload and bad decision making.
As an example, in a typical project, you may write a loose brief and use that to find and engage with a designer. The company will then likely show you a homepage design.
The design will include:
· Branding
· Layout
· Design
· Page Structure
· Content
· Calls to action
· Page features
· Imagery
· Etc
The point being that it is almost impossible to review this in any kind of useful way.
Your eyes may be drawn to issues with the colours, or images you don’t like, or the content, or how it looks on mobile.
The point being there is just too much information to process.
By mapping out the page in a more structured way you can determine what is important for the function of the page.
You can then review each page from the perspective of the goal you set for the page.
When the plan is complete and you start the design and build process you can then build wireframes that firstly show the structure and then layer in branding, imagery and content step by step and keep reviewing in relation to the page goal as you go.
This makes the whole process so much easier and ensures you remain focused on the goals for the page and the site.
The Page Mapping Process
Okay, now it is time to get started and start to map out the specifics for each page type
covering:
· Page Name & Number
· The Hierarchy
· The URL
· The Goal of the Page (and its category or type)
· Content Map
· Essential Features
Sitemap Example
Lets look at a simple sitemap to help us flesh this out:
- Home
- About Us
- Services
- Service A
- Service B
- Service C
- Products
- Product A
- Product B
- Product C
- Blog
- Blog A
- Blog B
- Case Studies
- Category A
- Case Study 1
- Case Study 2
- Category B
- Category C
- Category A
- Contact
A note on duplication
Whilst we have several categories, services, case studies and blogs we will only specify the structure of one of each.
Mapping our Pages
For each page we will fill in the following fields.
Step 1. General Site Features
Before we dive in, first list any specific features that are important to your project.
Some of these features are so obvious you may think it is not worth mentioning them but I find that it is better to be crystal clear and document what you are expecting. That way, there is less scope for confusion and problems down the road.
The following list should get you started:
Core Features
· Responsive Design
· Fast Loading
· Accessibility (WCAG)
· Secure
· Content Management System (CMS)
· GDPR Compliance / Cookie Consent
Navigation
· Mega Menus
· Search Functionality
· Breadcrumbs
· Calls to Action
UX
· Accessible forms
· Interactive Page Elements (accordions, tabs etc)
Content & Communication Features
· Chat Bots
· Live Chat
· Testimonials
· Revies
· Blog / News area
· Marketing Tools
· Analytics
· SEO Tools
· Tag Management & Marketing Tags (Google, Meta etc)
· Conversion Tracking
· CRM Integration
· Email Marketing
· Schema Markup
That list is not meant to be in any way comprehensive but it pays to not make any assumptions about what will be included with any project.
List these in your brief.
Step 2. The Site Template
Now, before we map out each page, we can map out the elements of the page that will be common to all pages.
Typically, every page on your site will have three main sections.
1. Header
2. Main Content
3. Footer
As a general rule of thumb the header and footer won’t change so there is no point documenting these for every single page.
Rather, just document the structure of your header and footer in one place and then concentrate on the main content for all other pages.
Header elements
· Logo
· Main Navigation
· Secondary Navigation(s)
· Call to Action
· Breadcrumb
Footer
· Navigation Links
· Contact Details
· Contact Form
Social Links
· Legal Links (privacy, T&C, cookies etc)
Misc
· Sticky Search
· Sticky CTAs
· Accessibility Tools
Document what you want to see in your header and footer and then move on.
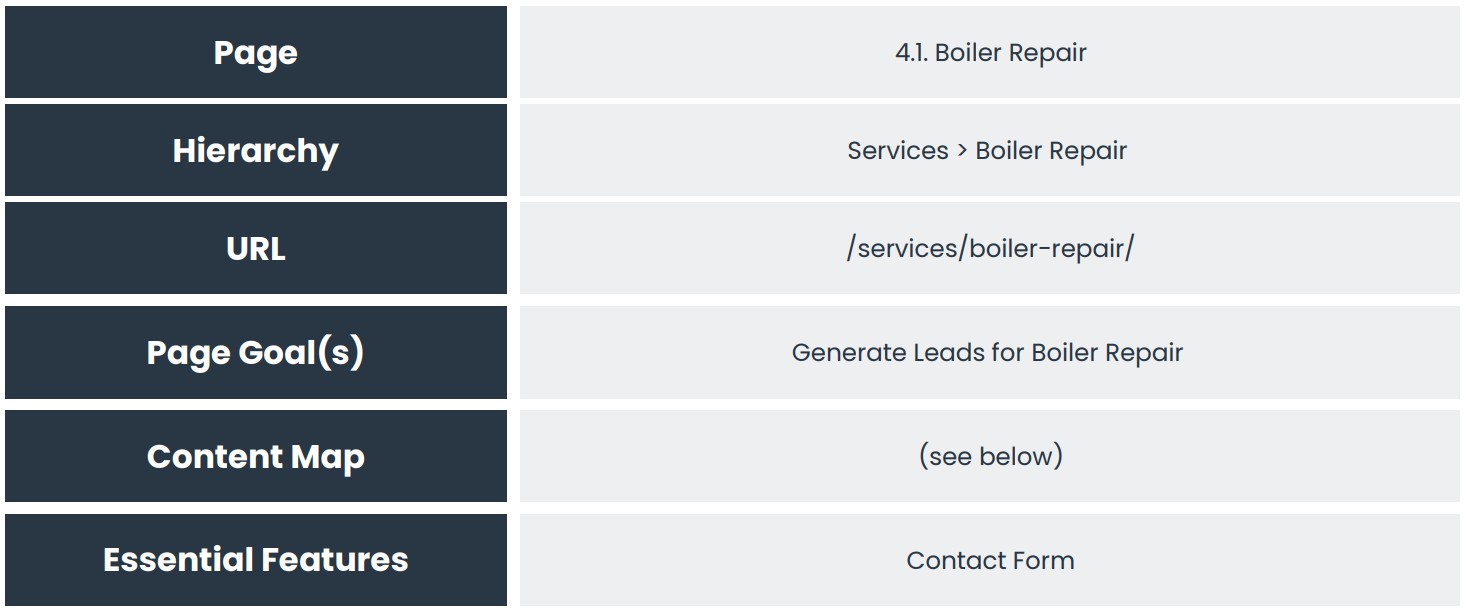
Step 3. Page Mapping
The final step here is to now document what you will need for each page.
You will want to work through your sitemap now page by page and document the requirements for each page.
You can do this in a spreadsheet, however, I prefer to do this in a document as you can have bullet points and it makes structuring the content and readability of that content easier for the final brief we are creating.
We would first recommend that you create a copy of the box below for each page (or type of page).
So for the following sitemap:
- Home
- About Us
- Services
- Service A
- Service B
- Service C
- Products
- Product A
- Product B
- Product C
- Blog
- Blog A
- Blog B
- Case Studies
- Category A
- Case Study 1
- Case Study 2
- Category B
- Category C
- Category A
- Contact
We would reduce that down to a single one of each page type so:
- Home
- About Us
- Services
- Service A
- Products
- Product A
- Blog
- Blog A
- Case Studies
- Category A
- Case Study 1
- Category A
- Contact
So we would end up with twelve page maps that cover not every unique page and each type of page.
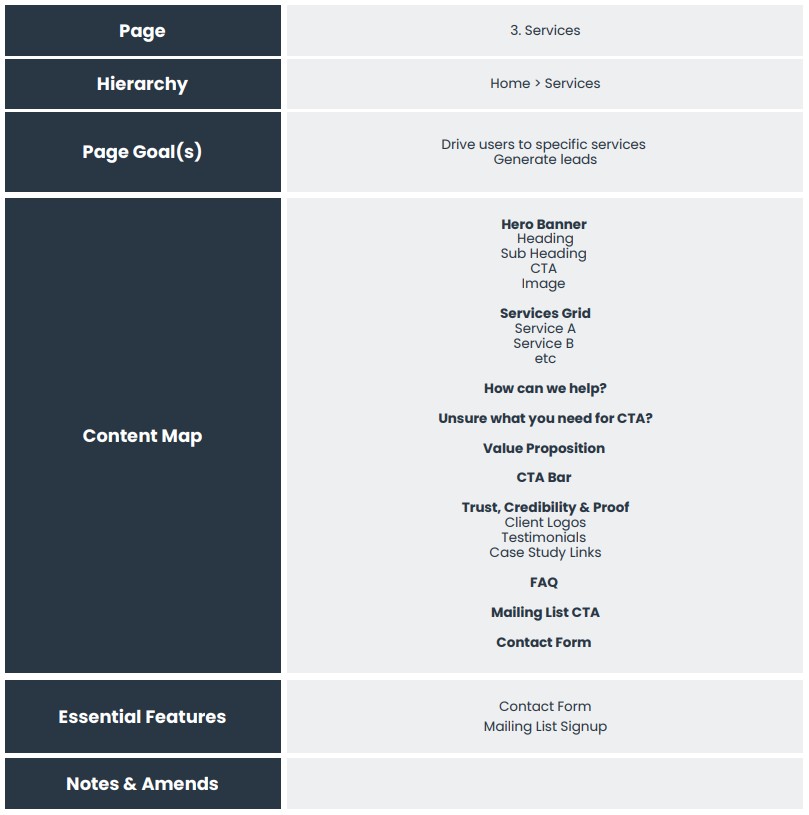
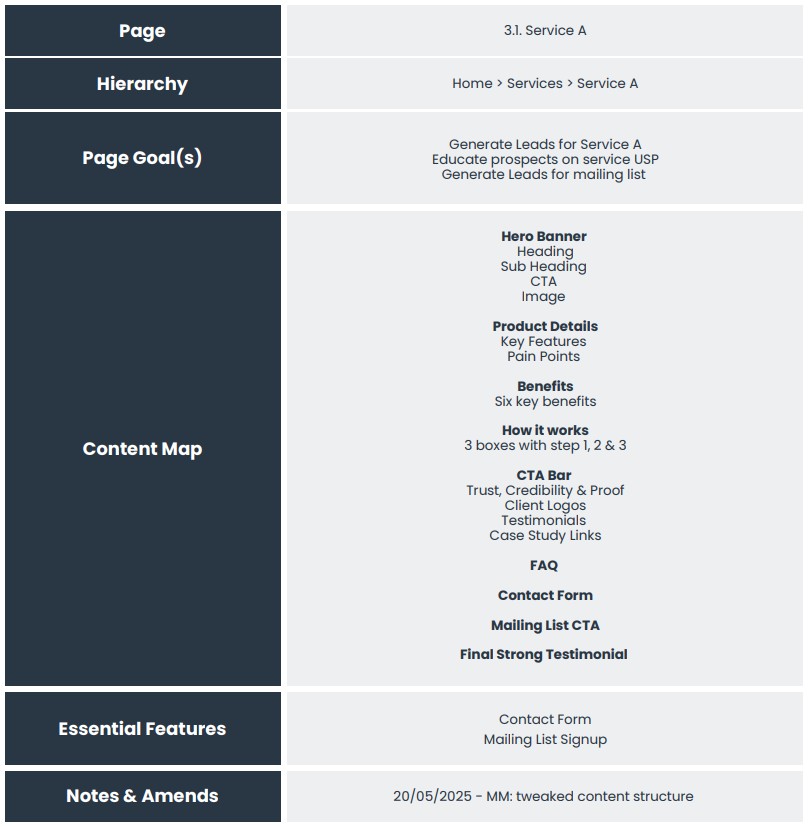
Page Examples
Let’s look at a couple of examples here. Remember when going through this process to work backwards and start with your product and service pages.
You can order these correctly in the plan but as a process it is helpful to start with the most important pages and work back to the homepage.

Summary
As before, this should be an interactive and research based approach. Look at your competitors, look at what they do well, what they don’t do so well, and map everything out for the pages on your site and document it all.
Book a Strategy Call
Give us a call, drop us an email or fill out the form and one of our web design experts will get right back to you.
- 0121 314 2001
- [email protected]
- 112 Zellig, Custard Factory, Birmingham, B9 4AT